
What Are We Doing?
We’re sure that this is a question a lot of people are asking as they begin to see works progress around the building, so we thought we would use this update to breakdown each stage of the work that we are carrying out and give a bit of an insight into what goes into the cladding remediation
Following recent successful site visits by the approved building inspector, the construction details for the cladding remedials have now been approved both in theory and practice. This gives us all assurance that, not only do the design work and do the job of protecting Milliners Wharf residents, but also confirms that the installation is being carried out to the highest standards.
We have 2 key stages of work that are carried out during the project, the first is works within the internal cavity with the second being works within the external cavity.
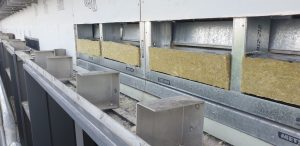
Works within the internal cavity are to stop the spread of fire inside the void between the plasterboard in your homes and the cement particle board (CP board) that forms the external face of the building behind the cladding, the below image shows an example of what these cavity barriers look like. We first of all need to cut a strip out of the external CP board which allows access to the locations where these cavity barriers are installed. The locations are at the edge of each floor slab and along all partition walls between neighbouring apartments. The fundamental reason for having these cavity barriers is to ensure that a fire in one apartment cannot spread to another and therefore keeps the neighbouring occupants safe.
Once the strip has been cut, the cavity barriers are installed using a fixing spike that holds them in place. They must be cut to a thickness that is at least 10mm thicker than the cavity itself, this ensures that the barriers are compressed when the boards are re-installed and eliminates the chance of any gaps being present that may let a fire pass through. The important thing is to make sure that any gaps around the wall framing are all filled and under compression, then any joints get taped to ensure that the separate pieces all stay together.
Once the cavity barriers are installed within an area, the CP boards can be re-installed, and all joints sealed. Sealing the joints with a fire rated sealant ensures that there are again no gaps for the fire to pass though the board into a different area. There are a number of checks to be carried out and recorded at different stages before works can progress, this allows us to ensure that all works are carried out correctly and provides evidence of this of future reference.
The next stage of the project is to install the external cavity barriers and insulation, the external cavity is the space between the external face of the CP board and the cladding. These cavity barriers work much in the same way as the internals and are also installed at floor slabs and partition walls, the only difference is that we also install them around windows. This is as the windows are effectively the weak point in the external wall and the cavity barriers prevent a fire that is contained within the cavity spreading into an apartment via the window openings and putting the occupants in danger.
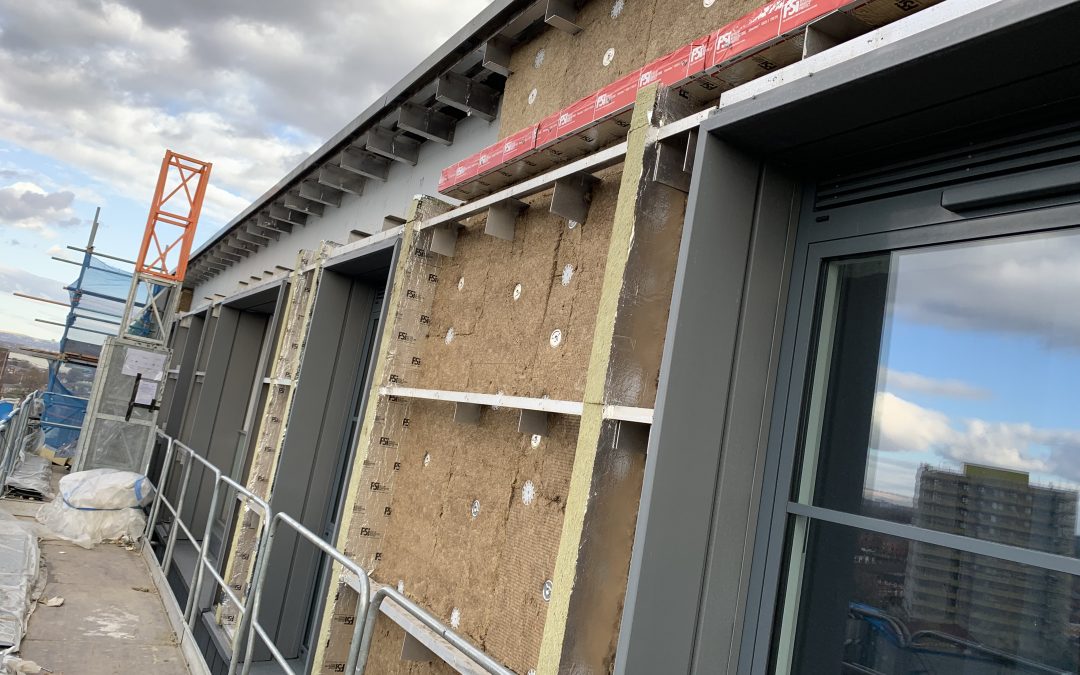
The external cavity barriers are also installed in a similar way with the fixing spikes being fixed to the building and then the cavity barriers being push one this spike. They are all again given at least 10mm compression against the back of the cladding to ensure that everything is tightly fitted and there are no gaps, all apart from the barriers that run along the floor slabs. These are the red ones shown on the main feature photo above, they are installed with a 25mm air gap from the back of the cladding. This air gap is to allow ventilation through the cavity and prevent moisture issues, however, they are installed with an intumescent strip that expands in the event of a fire to close the cavity and prevent the spread of fire.
Following the installation of the cavity barriers, all of the spaces between them are filled with insulation. The installation is cut to size and fixed to the building with fixing screws and washers, these hold the insulation snug to the building face without too much compression as to not affect the thermal performance. This is the stage at which the cladding can then be re-installed and an area marked as complete.
Hopefully this helps give an understanding of the works being carried out and allows residents to recognise the stage of the works when they look up to see what progress has been made.
We are currently progressing in a total of five different areas, four of these at L8 (two on the canal side, one on the carpark side and also Carruthers St elevation) along with one section at L1 below the wintergarden area. Each of these areas is currently having insulation re-installed and panels ready to be fixed back onto the building. Over the next week, we will be completing and inspection some of these areas before moving down to L7. We are planning to install another mast climber that will allow us to work in an additional area on the canal side but the date for this is still to be confirmed.
We have our Project Manager, Adam, based on site full time so feel free to have a chat to him if there are any questions that you may have. We also have Michelle, our resident liaison manager, in the site office every Thursday afternoon so feel free to pop in for a chat!
Hi Adam
Any idea how much longer the Caruthers St end is going to take to complete. We were informed weeks ago that each level would take two weeks. Also, is the plan still to dismantle the scaffolding level by level as each one is completed?
Thanks
Hi Kate, we are planning to have L8 complete today and then undertake inspections of the completed work this week. We are targeting Monday to start dismantling the top 2 levels off the scaffold.
We will then continue to remove each level of scaffold once works in that area are complete. This will be about 2.5 weeks per floor.
Thanks for the update Adam.